Lesson 2 goals:
_______________________________________________________________________________________________________________________________________________________
At end of lesson Students should have:
-Critically reviewed their current standing with their brainstorm at the beginning of the lesson. (Finished Superhero Brainstorm Sheet, Research sheet, and finally have their detailed brainstorm drawing completed)
-Have a basic understanding of how to do tonal shading, then reflect on how they did it. (Watched PowerPoint on shading techniques, practiced introduced techniques, then filled out reflection post on Blog page)
-Apply knowledge of and practice of finishing detailed brainstorm that includes all necessary graded criteria then recreating it on final paper. (Beginning of final project)
-Applying focus to detail and craftsmanship by outlining entire final pencil drawing with sharpie and/or pen, then erasing left over pencil marks.
-Reflect and critique others' progress on project in order to create best possible project. (Reflection Blog Post)
Part 1: Reviewing
So by this point in our project you should have filled out your Superhero Research sheet, the Guided Notes/Practice on measuring and drawing a person, and have a brainstorm drawing of what you want your superhero to look like. I quickly want to reference the things you need to have included in your superhero design before moving on.
Things to include in your design of your superhero:
-They have a unique costume AND symbol. EX: bat man has the bat suit with his bat symbol on his chest.)
-They display their power/ability
-They have some form of accessories, THIS COULD ALSO BE THEIR ABILITY!!! (EX: Bat Man has his utility belt, Wonder Woman has her lasso of truth, wolverine has his claws, etc.)
-They are in a stance and are the appropriate height (8 heads tall)
So when you have double checked those requirements move onto the next part below, learning about Shading!
Part 2: Learn, Apply, Review and Reflect
Last lesson we learned how to draw a proportionate person through starting with an advanced stick figure/skeleton, putting meat on the bones, adding flesh/skin, then finally putting details on our character. Those details came in the form of a super suit, accessories, facial expression and hair (if head is not covered), and more.
Today we are going to take those brainstorm character designs and make them go from flat 2D drawing to looking 3D. We will be achieving that through shading! Check out the PowerPoint below.
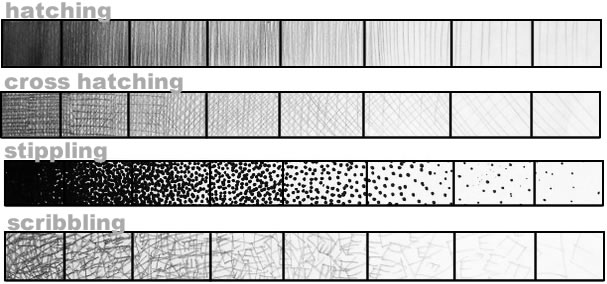
ASSIGNMENT: While watching the PowerPoint and the video(s) that it contains I want you to try doing some shading practice. I want you to create a tonal value scale, shown below, for at least 3 of the 5 listed shading techniques: Scribbles, Stippling, Contour Lines, Parallel Lines (also known s Hatching), and Cross Hatching.
Today we are going to take those brainstorm character designs and make them go from flat 2D drawing to looking 3D. We will be achieving that through shading! Check out the PowerPoint below.
ASSIGNMENT: While watching the PowerPoint and the video(s) that it contains I want you to try doing some shading practice. I want you to create a tonal value scale, shown below, for at least 3 of the 5 listed shading techniques: Scribbles, Stippling, Contour Lines, Parallel Lines (also known s Hatching), and Cross Hatching.
Here is a template you can use as a base to create your own Tonal Value Scale.
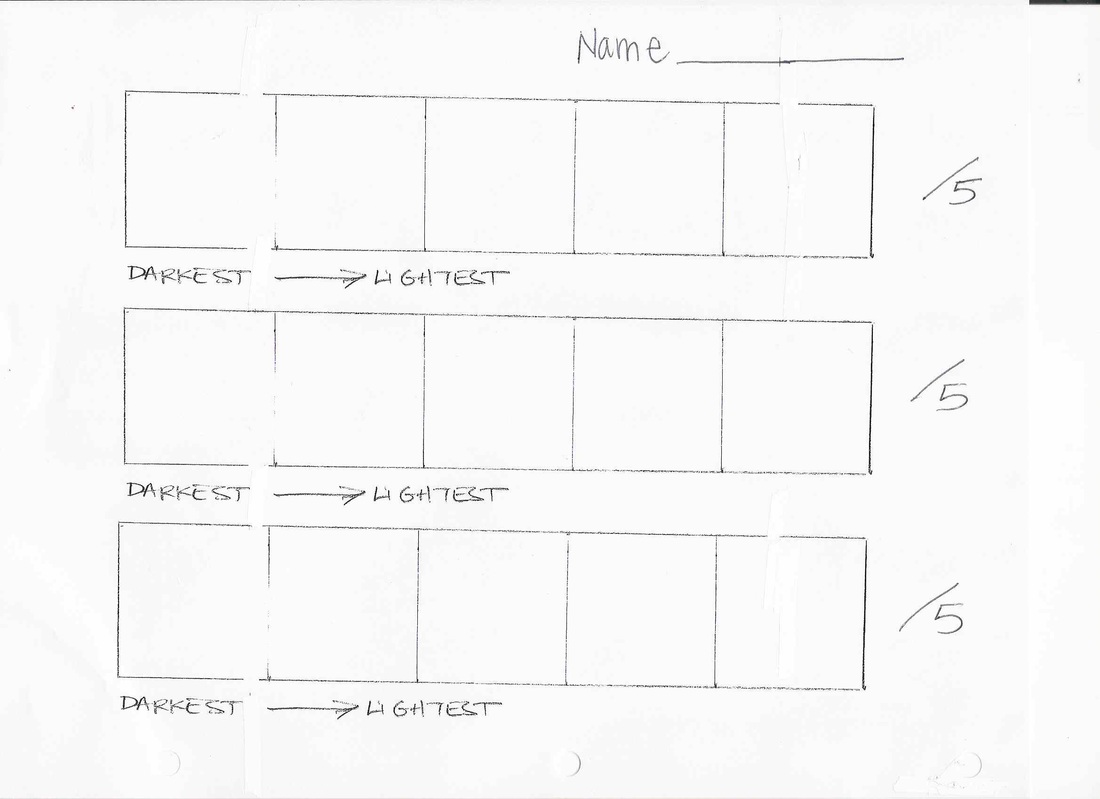
***Bring this in and turn it in to me during our next class, you will be receiving participation points for doing this!***
Now for the PowerPiont. See below.
When done I want you to reflect on the flowing questions. You will be doing so in a Blog Post, follow the link HERE to visit the page. Please remember to use full sentences and best spelling and grammar.
1.) What was the easiest shading technique to do and why?
2.) What was the hardest shading technique to do and why?
3.) What shading technique do you want to use on your superhero? Why?
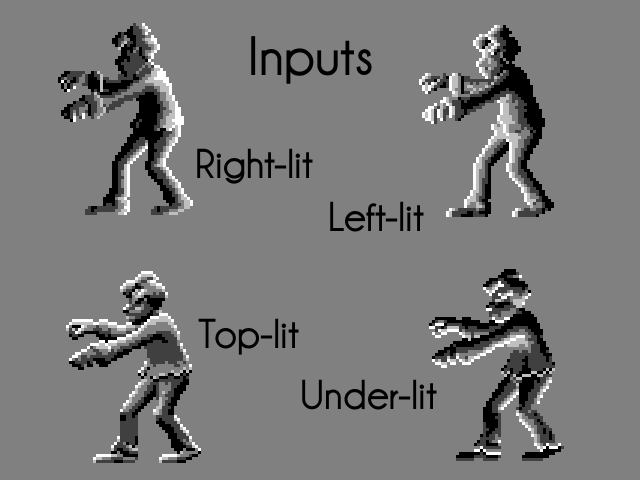
When finished answering these questions in the Blog start applying the shading to your character. Imagen where the light is coming from and do your shading opposite to that. Look at the example below for suggestions.
1.) What was the easiest shading technique to do and why?
2.) What was the hardest shading technique to do and why?
3.) What shading technique do you want to use on your superhero? Why?
When finished answering these questions in the Blog start applying the shading to your character. Imagen where the light is coming from and do your shading opposite to that. Look at the example below for suggestions.
Now it is time to start on creation of your superhero on the final paper! Make sure that your superhero takes up most of the piece of paper that you will receive, they need to be LARGE, not small. Also remember to add in a good amount of shading that shows a transition from dark, to med, to light, just like we did in the practice above. Just apply that thought to your character!
***IMPORTANT BLOG REFLECTION POST***
Now that you have your final character done in pencil I want you to get some feedback on what is working and what might need some work.
Follow the link to the Reflective Blog Post or choose it from the drop down menu above in the Lessons Tab.
For this blog post you will take a picture of your superhero and paste it here in the blog thread.
From there you will post two comments on another persons superhero, these comments will cover:
-One thing that they did really well.
-One thing that they could improve.
So each persons picture will end up with some constructive criticism to help guide you towards creating your best final project!
***IMPORTANT***
When posting your first comment please don't do it on someones who already has a comment under it, seek out someone who has no comments, if we do this then everyone will receive feedback. For your second constructive criticism comment you can chose who ever you want.
ALSO please be positive and do not point something out unless you can offer a suggestion on how to make it better. For example:
Good criticism- your shading looks almost all black and it is hard to tell what style you chose to use, you could fix this by making it more tonal, AKA have a more noticeable transition from dark, to medium, and finally to light.
Bad criticism- Your shading is not good enough.
When done with this blog post wait to move on to our Part 3, this is important so that you can get some important feedback before finalizing our pencil work!
Part 3: Create
At this point you have finished drawing your full figure in pencil. Our next step is going over your character using fine point sharpie or pen. Use these tools to trace over all the details and also outline your character. When going over your details remember to outline the details on the body, face, shading, and anything else important, NOT just a outline around your characters body. This is important because once you are done outlining you will then go over your entire project with an eraser, erasing any left over pencil marks and turning the paper back to white. So in summery:
1.) Outline ALL details with pen and/or fine point sharpie
2.) Use large eraser and carefully erase any and all left over pencil marks, should only be pen/sharpie when done erasing.
1.) Outline ALL details with pen and/or fine point sharpie
2.) Use large eraser and carefully erase any and all left over pencil marks, should only be pen/sharpie when done erasing.
